Posts

Showing posts from April, 2019

Transitions

Image
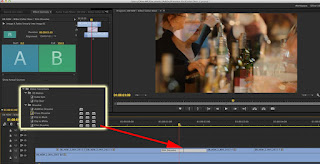
                                                          Transitions             There is no doubt to say that Premiere Pro is leading the market these days with its feature rich platform and interactive user interface. This production and editing software tool contains amazing video transition effects. If you want to develop classic professional looking movies at home then Premiere Pro transition effects can help you with great results. The article below contains complete details about how videos can be edited in Premiere Pro and how transitions can be adjusted in most effective manner over audio or video clips. Keep reading to get best assistance Many beginners find Adobe Premiere Pro platform little complicated and they are not able to apply desired transitions into their videos. If you are also facing such kind of problems but want to develop an attractive video as soon as possible then it is good to try FilmoraPro - Filmora's video editor for pro. This software platform

Most Essential Keyboard Shortcut

Image
            Most Essential Keyboard Shortcut                   Most applications have keyboard shortcuts to save you mouse clicks. But video editors know that using shortcuts for repeated actions like playing footage, setting in and out points, inserting, and trimming, are vital to getting that cut done on deadline. Adobe Premiere Pro also has hundreds of commands that aren’t mapped by default, so spending a few minutes in the Keyboard Shortcuts window to map your custom layout can turn more of your editing time into creative time. Here are 10 default shortcuts that you should know, and 10 shortcuts that are worth mapping, from our editor’s resource book The Cool Stuff in Premiere Pro. 10 Useful Default Keyboard Shortcuts These work with the default layout. Go to the File menu (or Premiere Pro CC menu on Mac) and choose Keyboard Shortcuts > Keyboard Layout Preset > Adobe Premiere Pro Default if it isn’t already selected. 1. To expand and minimize your timeline tr

10 Keyboard Shortcuts Worth Mapping

Image
      10 Keyboard Shortcuts Worth Mapping Search for these in the Keyboard Shortcuts window, then drag the command to the shortcut key you want to map it to. When finished, you can save your custom keyboard layout preset for future use. 1. Your first step after creating or opening a new sequence should be to check your Sequence Settings. Why not map a shortcut for it? 2. Just as Zoom to Sequence zooms you all the way out, Zoom to Frame will zoom you all the way in to the frame level. Mapping this to Ctrl+\ (Cmd+\ on Mac) is easy to remember if you already use \ for Zoom to Sequence. 3. If you cut a clip in two but don’t remove any frames, that’s called a through edit. Join All Through Edits will rejoin any through edits in your selection. 4. Adding keyframes for audio volume or video position can mean a lot of clicking with the mouse – unless you map the Add or Remove Audio/ Video Keyframe commands. 5. Show Audio Time Units lets you zoom in – and adjust edits – at th

Why to use presets

Image
                              Why to use presets                           Are you fed up with performing the same repetitive tasks in Premiere Pro? Do you often find yourself getting bored and wasting time with mundane and repetitive edits, instead of the fun and creative challenge of producing a video? Premiere Pro presets are an excellent way to automate repetitive tasks and to free yourself to work on the creative side of editing. Here’s everything you need to know…Working with effects in Premiere Pro can be demanding on your computer, so if your computer is struggling to cope you should Why Use a Premiere Pro Effects Preset? Effects presets can save you a large amount of time.If you’re a video editor or YouTube content creator, you may have dozens of effects or common editing tasks you perform on every video. With effects presets, you can speed up your workflow into a one-click process. Here are some common editing tasks I perform when editing some of our review

Make your text more Smooth

Image
                         Make your text more Smooth                  Adobe comes out with major updates every once and a while. These updates usually add a host of new features and content! In the 11.1 update, Adobe changed the entire process of graphic creation in Premiere Pro. With this change, came the introduction of the new text tool. No longer do you have to create a title for some text. Now you can just write directly onto the timeline. Today, we go over how to use Adobe Premiere Pro’s New Text Tool. How to Use Adobe Premiere Pro’s New Text Tool Find the text tool in the tools panel. It’s at the very bottom of this panel by default.Click on this tool, go to your preview panel and click. If you just click, it will add a self adjusting box. If you click and drag, you can create a set size that won’t adjust.Type anything you want. You will notice in the timeline, a new “graphics” layer has been created. This graphics layer houses your text. A single graphics layer

What is RGB

Image
                                                What is RGB                Glitch effects are quite popular in any technology related films. They are a great way of showing that technology is going bad. They can also be used in dreamy or confused sequences to show the audience that things are off with the character. You can create these effects in Premiere Pro pretty simply with just a little color adjustment and some time posterization. Today, we talk about the RGB glitch effect in Premiere Pro. Create a new sequence with your desired settings. Drag in the footage you wish to glitch Keep or dis attach the audio.Copy and paste the video 3 times. You can use the copy and paste tools, or you can hold down the alt key, click on the file, and then drag it up twice.Go in to the color work-space or add the Lumetri color effect to your footage. Go in to the Lumetri color panel and look for the “curves” adjustment.Click on your first clip. Go to the RGB curves, select the red d

Whip Pan Transition

Image
                                   Wip Pan Transitions                  Whip pans are a fun way to cut between clips. They can be used in fast paced conversations, action movies, or even to simulate a knife throw simulate a knife throw. To capture this effect naturally, one would end one shot with a really fast pan. Then, the shot it is cutting to would begin with a fast pan in the same direction. This introduces a host of problems, specifically that you have to know in advance that you want a whip pan transition. Also, unless you have a higher end transition, you have a good chance of getting some damaging rolling shutter from the fast transition. So in this tutorial, I will show you how to create a whip pan transition in adobe Premiere Pro entirely.Import the footage on to the timeline and line up the clips so they have a simple cut between the two.Create a new Adjustment layer. This can be done from file->new->adjustment layer, or from the project panel by clicking

Edit to a beat

Image
                           Quickly Edit Footage to a Beat  Music often times guides our edits. Putting a series of cuts on to the beat of a song is a great way to bring the piece to life. Often times though, this can be a time-consuming process. For one minute of footage, it might take up 100 or greater cuts. This is where Premiere Pro comes in to save the day. With the simple technique I am going to describe, you can get Premiere to make the edits for you. It will grab all of your footage, and put them onto the timeline on to the beats, making all of the cuts you need. From there you can then tweak it to how you like. Let’s get started.Start with a new Sequence with the appropriate settings for your footage.Find an audio clip you want to edit with. Drag that on to the timeline.Make sure your markers are set to a keyboard shortcut that is easy to use. I have mine set to the M key.If your’s is not set to this key. Go up to edit->keyboard shortcuts. Go down to the search bar,

Isolate Color in premier pro

Image
      Isolate Colors in Adobe Premiere Pro                When we really want a color to pop, we can isolate that color. What this means is taking the color, and making it the only color that has any saturation in the footage. This works really well with colors that pop. For example, a lot of times this effect is applied to a flower, or a bright fire. Isolating the color is also a great way to draw attention to a certain point of shot, as our eyes will naturally look at what is in color first. In this tutorial, we are going to be talking about isolating color. Drag your footage to create a new sequence. Trim the video down the clip how you would like.Use Lumetri to bump up the exposure, contrast, and saturation. This will make the color pop a little bit more, and make it easier to isolate the color.Go over to effects and find the “Leave Color” effect. Click and drag this on to the footage.Now go up to Effect Controls, go down to the leave color effect, and click on the eye

Hand Tool

Image
                                                                                     Hand Draw Tool                 Many of us would love to create a hand-drawn animation that’s made from scratch – with love and a lot of pencil or pen strokes – but sometimes there’s just no time for that. But I really don’t have to because I have an creative process that rolls from Adobe Illustrator to After Effects workflow that works great for animation.The end result will have the rough feel of cel animation – but you’ll be able to concentrate more time on bringing out your characters and storytelling in your animation.In this tutorial, we’re going to learn a little about how to set up your drawing in Illustrator and then how to set up the layers, keys and expressions for getting that hand-drawn look.If you want to see more on how to create these types of Illustrations, you’ll see many of the same techniques in this Illustrator course, and lots of the same animation approaches in th